
I have worked on lozalization for phpBB and some other projects before - mainly in PHP and for my native language Bangla. I think it's kind of a magic, the way an interface changes into some other language. So I thought I would write on how to do the same thing on Lazarus. So here it is.
In the old days, software used to have only one language on its interface. Things have changed since then. Now we like to have English, plus our own language. So, if you are writing a very useful program, it is great to have some of the popular languages on the same program. These days programs are becoming multi-lingual, supporting multiple languages - which is a great way to ensure accessibility for all. Especially for people who can't speak English. So let's get onto it.
Localization is actually easy in Lazarus. You just need to get the hang of the basics, that's all.
Easy Peasy Basics
Start Lazarus.Create a new Application Project (Project - New Project - Application - OK).
Let's learn it through a test project. It will be very easy to learn for you step by step. If you're thirsty for more, I've got a Tutorial Project later on. So buckle up...!
Step 1: Basic Implementation
For a basic localized application you need to:- Save your project in a folder (this is important)
- Go to Project Settings - i18n - Enable i18n (this would enable multi-language support for our project)
- Set a directory for po files (languages or locale). You can just type "languages" or "locale" to keep it inside your project directory.
- Ensure that Create/update .po file when saving a lfm file is checked. Click OK.

- Go to Code View (F12) and add DefaultTranslator under uses clause
- (Optional) Add a new resourcestring clause and define strings you want to be translated. Then use them like variables throughout your code. For example:
resourcestring
  HelloMessage = 'Hello World!';
  CloseMessage = 'Closing your app... bye bye!';
Note: Captions and other string based properties will be automatically added for translation without writing any code. Lazarus is awesome at this, so no worries. You just need to add strings that are not on properties in this clause.
- Run the project (F9 or Run - Run)
The directory you set earlier on the project settings will be created and a projectname.po file will be created inside the directory for the strings you wrote earlier in the code.

Everytime you Run/Save the project, this file will be updated with the added or changed string list. It will include all the string values in Captions, etc. of components, so you won't have to add them manually. Easy, isn't it?!
Now, install poedit. poedit is free, open source and cross platform and we use it to edit translation files. Open the .po file in poedit and just hit save. This will automatically create a .mo file on the same directory.

In case it complains about language not set, then click the Set language button and set English (United States) as the language and it should stop.

Remember, .mo files will be used on runtime - on the exe. (.po files are ignored on runtime and are just for editing purposes. So .po files are just there for us, the developers.)
Step 2: Adding Languages to Translations
Now copy the projectname.po file (on languages or locale folder) and paste into the same folder and rename to add 2-letter language name to its extension.For example, if you want to translate the strings to Spanish, copy the original .po file, then rename to projectname.es.po

If you are not sure what should be the 2-letter code for your language, check here. (The code should be under "ISO 639-1" column).
Open with poedit, then translate the strings and save. The .mo file for the .po file in your language will be created.

Whenever the project is run, you will see the updated strings in all of the .po files you created. To make it reflect on the exe, you should open the .po files in poedit and hit save. This will create the .mo files and the exe will see that.
Step 3: Changing Language with Command Line
If you want to see how your program would look with certain language chosen, you can run your program with --lang [language code].For example, open Command prompt or Terminal and enter:
cd /path/to/project
./project1.exe --lang es
I don't know Spanish, but Google Translate says "Form" in Spanish is Formulario. So I translated the Form1 string into Formulario1 and Saved the project1.es.po file.
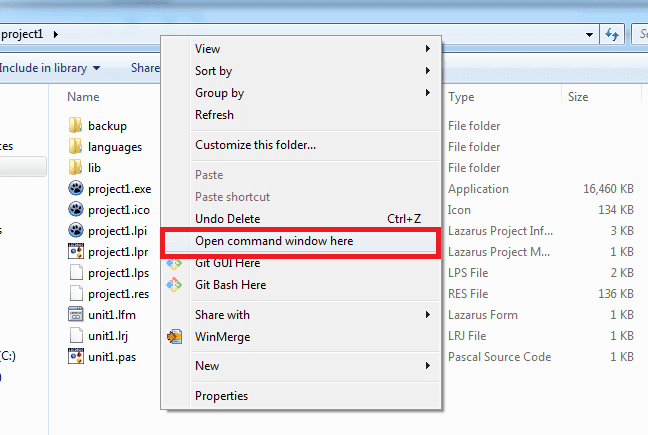
Then went to project directory, then right-clicked with Shift key pressed at the same time and then selected Open command window here.
Now run the executable with --lang es.

This will show your application in Spanish language:

You can also try sending this command line argument from Lazarus, which is great if you want to test your application in certain language from inside Lazarus. Go to Run - Run Parameters. Now enter --lang es under Command line parameters field, then click OK. Now hit Run - Run and your application should appear in Spanish language.
Step 4: Changing Language on Runtime
Sometimes you may want to switch the interface language manually with a button or something. You can do that as well! You can use code like this:procedure TMainForm.MEnglishlanguageClick(Sender: TObject);
begin
SetDefaultLang('en');
end;
procedure TMainForm.MGermanLanguageClick(Sender: TObject);
begin
SetDefaultLang('de');
end;
Also, you'll have to add LCLTranslator in the uses clause.
So here, SetDefaultLang() procedure is setting the language. You can pass it the language code and the magic happens! All your components change language. How cool is that?!
I hope you've learned the basics for translations for your programs. Now let's create a test project to see them in action!
Tutorial
Create a new Application project (Projects - New Project - Application - OK).Then you know the drill... save the project in a folder with File - Save All (it is important to save somewhere to generate language files later).
Go to Project - Project Options - i18n and then check Enable i18n checkbox. Then enter languages under PO Output Directory. Make sure Create/update .po file when saving a lfm file is checked. Click OK.
Now switch to code view (F12). Then add DefaultTranslator and LCLTranslator under uses clause:
uses
  ..., ..., DefaultTranslator, LCLTranslator;
Then paste this before implementation line:
resourcestring
  HelloMessage = 'Hello World!';
  CloseMessage = 'Closing your app... bye bye!';
  GreetMessage = 'Hey %0:s from %1:s country!';
We are using placeholders %0:s and %1:s. We will replace them later with Name and Country values. Details later on.
Switch to Form view (F12). Place 3 TGroupBoxes on the form. You many want to resize the form accordingly. Change their Caption properties to become something like this:

Now create 2 TLabels, 2 TEdits, 5 TButtons and change their Caption or Text to make them something like this:

Now let's change their Name property into something more meaningful. Change the Name of top left button to BtnMessage. Change the Name of the 3 language buttons to BtnEnglish, BtnSpanish and BtnBangla respectively. Name the 2 TEdits EdtName and EdtCountry. Then name the button below to BtnGreet.
Double click BtnMessage and enter:
procedure TForm1.BtnMessageClick(Sender: TObject);
begin
  ShowMessage(HelloMessage);
end;
Double click BtnEnglish and enter:
procedure TForm1.BtnEnglishClick(Sender: TObject);
begin
  SetDefaultLang('en');
end;
Double click BtnSpanish and enter:
procedure TForm1.BtnSpanishClick(Sender: TObject);
begin
  SetDefaultLang('es');
end;
Double click BtnBangla and enter:
procedure TForm1.BtnBanglaClick(Sender: TObject);
begin
  SetDefaultLang('bn');
end;
Double click BtnGreet and enter:
procedure TForm1.BtnGreetClick(Sender: TObject);
begin
  ShowMessage( format( GreetMessage, [EdtName.Text, EdtCountry.Text] ) );
end;
With the above command we are formatting GreetMessage to replace the placeholders and pass the resulting string to be shown on our message.
Remember that we placed %0:s and %1:s in the GreetMessage resourcestring?
resourcestring
  ...
  GreetMessage = 'Hey %0:s from %1:s country!';
We have now replaced the placeholders in the string with format() function to show the Name and Country on the string.
We could've used multiple parts of the string in multiple resourcestrings, but Lazaurs wiki suggests to use format and use placeholders. This way translators can get a freedom, even if they need to change the order of the placeholders. In my experience, I have seen use of placeholders in famous projects. So, this is the best way to do this, trust me.
Then select your form, then go to Object Inspector - Events tab. Click OnClose and click on [...] button beside it and enter:
procedure TForm1.FormClose(Sender: TObject; var CloseAction: TCloseAction);
begin
  ShowMessage(CloseMessage);
end;
Now add your translations in the languages folder. Copy projectname.po twice and rename them to projectname.es.po and projectname.bn.po.

Now open the files with poedit, go to Catalog - Properties and make sure language is set for each one, then save. This will create .mo files for each one.

Now Translate the .po files and save. You can also download the project source code and use the translation files I used.
Now run the project (Run - Run or F9). You should the form as usual.

Then click the language buttons to change language.

The messages should also work. If you click the message button you should see the localized version of the message.

Download Sample Code ZIP
You can download the above example tutorial project's source code from here.Size: 783KB
The package contains compiled executable EXE file. It has been compressed with UPX so some antivirus may see it as a false positive.
Ref:
http://wiki.lazarus.freepascal.org/Step-by-step_instructions_for_creating_multi-language_applications
http://wiki.lazarus.freepascal.org/Translations_/_i18n_/_localizations_for_programs
http://wiki.lazarus.freepascal.org/Getting_translation_strings_right
http://forum.lazarus.freepascal.org/index.php?topic=27047.0


